
Once you have your shop up and running, perhaps even with some customers coming through, you may want to manipulate the WooCommerce checkout page in some fashion.
This of course could be for many reasons. Maybe you simply don’t like the look of it. Or, there are fields that you may want to include or exclude.
It could also be that you have been analyzing stats. You may have found that there are way more abandoned carts than you are comfortable with. Also, someone may have suggested to you that a one-page checkout may help with sales.
Well, whatever the reason, I am glad that you stopped by.

The Complexity of the “Edit WooCommerce Checkout” Query
Trying to answer the seemingly simple query “how do I customize my Woo checkout page” isn’t so easy to do. It has some ambiguity to it. This query could mean many things. The possibilities here are sometimes based on opinion. More often they are based on personal preference. I will do my best for you though. I will share some common (and perhaps not so common) methods, complete with possible caveats, and in some cases the exact code if needed. All in as simplified of a way as I know how.
Please keep in mind though before continuing, modifying the checkout process can have minor or significant impacts on sales and conversions, positive or negative. Or, even no impact at all. Testing and/or mimicking the success of others may be key in this process. Let’s continue.
This article isn’t meant to judge your decisions. Also, it wasn’t written to suggest a customization option to go with for your checkout page. It doesn’t attempt to document all the possible methods either. Instead, it explains some of the varied options that are available and practical for many shopkeepers.
Table of Contents
WooCommerce Checkout Extensions
To enable eCommerce functionality on your WordPress-driven site you need an eCommerce plugin and an eCommerce aware theme. You chose WooCommerce as your plugin and perhaps you chose the Storefront theme, as your Woo-aware theme. Regardless of the chosen theme though, when desiring further features for Woo, you can reach for another plugin. Since the plugins are dependent on the WooCommerce plugin, they are more specifically called extensions.
The Woo Marketplace has many checkout related extensions, that are generally meant to work regardless of the chosen theme. Therefore, even if you’re not using Storefront (or a Storefront child), many of these extensions could satisfy your needs.
Subscriptions, Support, and Nulled Extensions
So that you’re aware, in many cases, the available checkout customizing tools will carry a recurring fee (usually yearly). And as indicated on the Woo site, you will continue to get updates and support during the subscription period. This is a very important consideration.
Many sites out there carry so-called nulled versions of these premium extensions, but please be careful. Having these installed will disqualify you from getting support from the extension creators, and may even disqualify you from getting general WooCommerce support. Further, you can’t always be sure if any malware or similar malicious code is lurking in these extensions. I personally have been commissioned to repair many sites where it turned out the culprit was malicious code from tools purchased from sites that did not develop the said tool. Have a peek at the WooCommerce Support Policy to get a clearer picture of what is and isn’t covered. It’s a relatively simple read.
With that said, let’s go through some of the more popular theme independent Woo extensions that will help you with checkout customization.
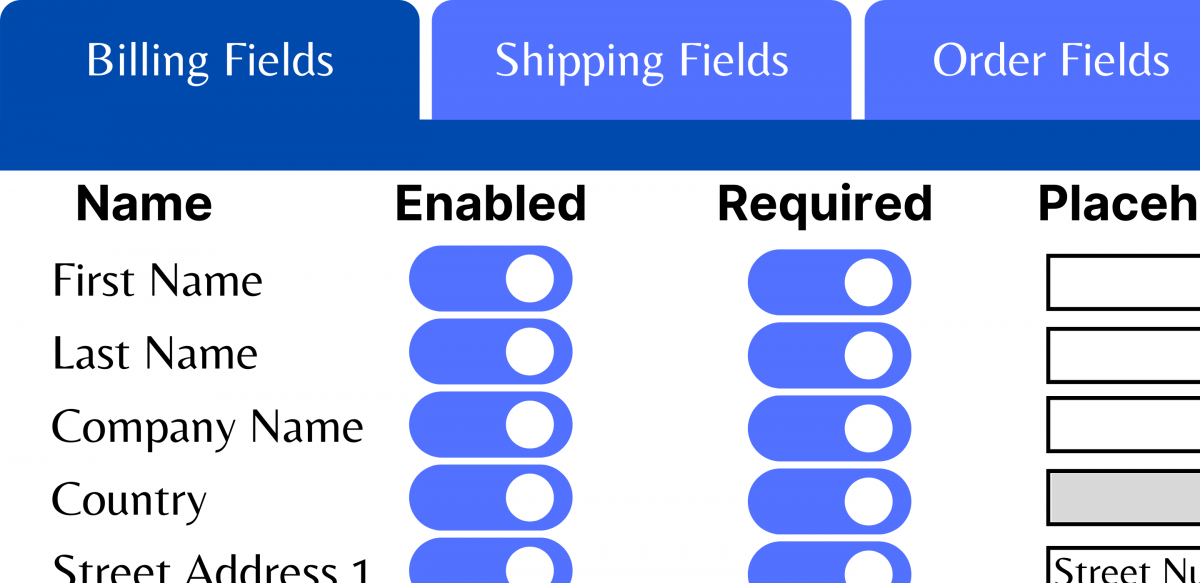
Checkout Field Editor
In short, this extension provides a simplified way to add, edit, and remove checkout fields. It also has other field manipulation options like placement, placeholder text, and the ability to choose whether you want the field to be required or not. Should this ability be included in the default WooCommerce plugin? Arguably, yes. But since it isn’t, here is one ready-made solution if that need arises.
Checkout Add-Ons
Although somewhat confusing (to me at least) what all the features entail, this is another solution for adding new fields during checkout. And the fields can be conditional based on factors like the number of products in the cart, how much is being spent, etc. A popular use case for this extension is to add gift wrapping options during checkout. If you want to see the full feature set, have a look at the product page linked to below.
Conditional Checkout Fields
This is another editor for the default checkout fields, and it also allows you to display fields conditionally. You can show fields for specific products or categories of products, or specific to certain customer groups. The invoice email, the order page, the ‘my account’ page, and also during the WooCommerce checkout process, is where these fields end up. Learn more at the links below.
Please be sure to look fully at the product descriptions and feature sets for the tools above. Some may or may not be compatible with other extensions. Also, some features may overlap, and you could potentially get all desired features from just one extension alone. Certainly, price is a factor as well. The prices are subscriptions allowing you to continue to receive updates and support (albeit limited) during the subscription period.
WooCommerce One Page Checkout
The product page for the One Page Checkout extension refers to a poll that says the reason that 10% of shoppers abandon their carts is that the checkout process is too long. A study quoted here indicates that cart abandonment can be as high as 63.23%!
Cart abandonment can, and often is, blamed on multi-page checkouts. Having a single-page checkout process may be the remedy. Let’s explore one popular option to accomplish that here.
This extension will allow the flow where products and checkout are on the same page. With the use of the shortcode, any page can become a WooCommerce checkout page. Using the shortcode, you can include any and all products, and select from one of the available templates. Knowledge of the WooCommerce templating system will let you use custom templates as well.
Or, you can include the checkout automatically on any product’s sale page by clicking “One Page Checkout” in that product’s edit screen. It also works seamlessly with a wide variety of other popular premium extensions, depending on the template used.
This extension, which is developed and supported by WooCommerce, is in my opinion, a much more thought-out and well-rounded tool. It provides full customization and a quick, seamless checkout process for your customers.
Quick DIY WooCommerce Checkout Extension
If you are just looking for a simple, free approach to customizing some of the default Woo checkout fields, a custom extension could be the answer. I will provide a link to the code below. Keep in mind though that you will need to edit the code slightly to meet your needs (I explain how). One incorrectly placed character in the code can bring down the house of cards quickly. But, this can also be quickly remedied if you are prepared. With that said though, it is best to try this first in a staging environment if one is available.
I have thoroughly tested this code on a brand new install of WordPress v5.5.3. The only plugin that I have installed is WooCommerce v4.7.0, and I am using v2.9.0 of the Storefront theme. I am not doing anything destructive in the code. I am not removing hooks so this shouldn’t interfere with other extensions.
When it comes time to use your new plugin, my suggestion would be to connect to the server by SFTP. That way, if it does crash the site, you can quickly rename or delete the plugin folder. This will stop the code from running, and the site should behave as it did prior to activating it.
A Note on Using SFTP
How to connect to your web server’s file system via SFTP is beyond the scope of this article. However, I will provide a bit of information to get you started. You can get the SFTP login details from your web host. It was probably sent in the welcome email when you signed up. You may also check their support docs, or contact support as a last resort. Also, they will probably have some guides to help set up some of the more popular SFTP clients.
When you log in to the server with your SFTP client, look for a folder called “public_html”. You may already be in that folder when logging in. You will then look for the “wp-content/plugins” folder. That is where you upload the plugin folder and file described below. Your host can likely help with this part if need be.
Below is a list of the default WooCommerce checkout fields. We will be able to turn off some of these fields and choose whether they are required or not in our code. We can also customize the label and placeholder text if desired.
- First Name (required)
- Last Name (required)
- Company Name
- Country (required)
- Street Address 1 (required)
- Street Address 2
- Town / City (required)
- State / Province (required)
- Postal / Zip (required)
- Phone (required)
- Email (required)
- Order Notes
Most of the same fields as above are present for the Shipping fields as well.
The Code
My intention was to include the code directly in this article. When I started to write it though, I added lots of comments and spacing. I did this to be more thorough, and hopefully, make things easier. In the end, I felt it was too large to just embed it here. Instead, I uploaded it publicly to Github. On there, I have complete installation instructions. And, in the file itself, the one you will be editing to disable fields, edit placeholder/label text, and decide which fields should be required, I have also included exact instructions for editing.
Visit this link to get the code from Github
The bonus with using extensions is that when choosing ready-made extensions from the WooCommerce Marketplace, it’s possible to get up and running rather quickly. If you have mastered installing and activating plugins, and especially if you have already configured your store, configuring an extension should be a snap for you. And if you need a hand, after going through the docs, a friendly Happiness Engineer should be able to assist further.
Storefront Checkout Customizer
I would be remiss not to include the Storefront specific approach here. Storefront, as you may or may not know, is the default theme for WooCommerce. In the words of Woo, it is built for WooCommerce, well-maintained, fast, and flexible
. They recommend it in the first email sent to you after setting up your WooCommerce account. It’s also right there on your screen when choosing a theme during the Woo Setup Wizard.
In other words, the Storefront theme is used a lot, and odds are, that’s the theme you have in use. The Woo team creates, maintains, and recommends this theme. That, and it’s free.
It is a highly recommended theme for WooCommerce shops because although there are other great themes made for use with Woo, not all of your everyday WordPress themes are Woo-ready. Also, there are many available child themes for Storefront. Think of child themes (for the most part) as extension themes that change the look and feel of your store, but leave the core code intact and maintained from the source. As a result, in some cases, you can customize the look of the checkout page simply by installing a child theme after installing Storefront.
Storefront Powerpack
If using Storefront, in order to activate the options for modifying the checkout page, the premium Storefront Powerpack extension is required.
Powerpack contains the Storefront Checkout Customizer that opens up a new top-level section in the Customizer called “Checkout”. This gives varied layout options (stacked and two-column addresses), a “Two-Step Checkout” option for the “stacked” layout, as well as the distraction-free checkout option.
The well-maintained documentation for Storefront Checkout Customizer, screenshots, and a deeper description can be found on the official Woo site.
Custom Checkout Page Templates
A more advanced approach to customizing the checkout pages is by overriding some of the built-in templates. If present in your theme (because you can add them to an existing theme), then WooCommerce will use your templates instead of the default ones.
For theme overriding, shopkeepers generally find someone that is familiar with WordPress, WooCommerce, PHP, HTML, CSS, as well as JavaScript to create them. The issue when outsourcing this task though is that if Woo ever upgrades the templates to take advantage of new features, fix bugs, deprecate features, or something else, your templates will go stale. The core functionality needs to be kept in sync with core Woo files.
Using Trusted Child Themes to Override Templates
Therefore, it is often much better to find a child theme that overrides the templates files. And not just any child theme, one that you feel confident will be kept up to date alongside Woo updates. Many times I have worked on client sites that were having “Woo issues” and it turned out they were using out of date template files that they used to override the defaults.
So, it’s imperative that you know what you are getting into before following this path. It’s for informed shopkeepers and developers that are keeping up with changes to the WooCommerce templating system.
The Woo developer-focused blog is the perfect place to keep track of these updates. In addition, you can check near the end of the screen at WooCommerce > Status > System Status in the WordPress Dashboard to see first if your theme is doing any overrides, and second if there are warnings the templates need updating.
Again, this is more of a developer-friendly approach, and care must be taken to be sure the templates don’t go stale. If you are using the One Page Checkout extension, there may be some templates being overridden as well.
In Conclusion
As you can see, with the above list of checkout customization options for WooCommerce, they vary in type, complexity, and even cost. And there is no shortage of other customization techniques available for the checkout page that I didn’t cover.
As an example, with a bit of understanding of your web browser’s developer or inspect tools, and some CSS knowledge, you can change colours, sizes, and even move things around.
Please keep in mind though, that it’s not always the look and feel of the checkout page that can affect conversions. It can be a number of factors, such as:
- pricing
- trust
- speed of the site
- speed of the checkout process
- user-friendliness
- and much more
Also, when adding new code (plugin, extensions, or theme) that is meant to optimize or customize things in your shop, it’s best to be thoughtful. New code could bring in new vulnerabilities, speed issues, or ongoing maintenance that needs to be performed (as in the template overriding discussed).
And one inherent issue with WordPress is also its gift to us. It’s the very hooks that allow plugins and extensions to provide deeper control. The issue comes when multiple plugins or extensions, or the theme, compete for priority on those hooks. This could create speed issues and unwanted behaviour making troubleshooting more difficult.
If I could offer any advice, try to stick close to WordPress and WooCommerce developed tools and themes. Plus those from highly reputable companies. Also, have a good idea of what WordPress and Woo do out-of-the-box before adding extensions. And know what your extensions are doing. And make changes incrementally, and test before making further changes.
If nothing else, ask customers how you can make their shopping and checkout experience better. Happy shopkeeping!